This node takes a Sheet and a Revision object as inputs, and removes that Revision from the Sheet. It can be combined with List.Map and List.LastItem as below to remove the last Revision from every input Sheet.

This node takes a Sheet and a Revision object as inputs, and removes that Revision from the Sheet. It can be combined with List.Map and List.LastItem as below to remove the last Revision from every input Sheet.
This node converts a Dynamo surface, poly-surface or solid into a Revit family. It then places an instance of that family inside your project, reflecting the geometry position from inside Dynamo. It currently supports Revit 2014 to 2016.
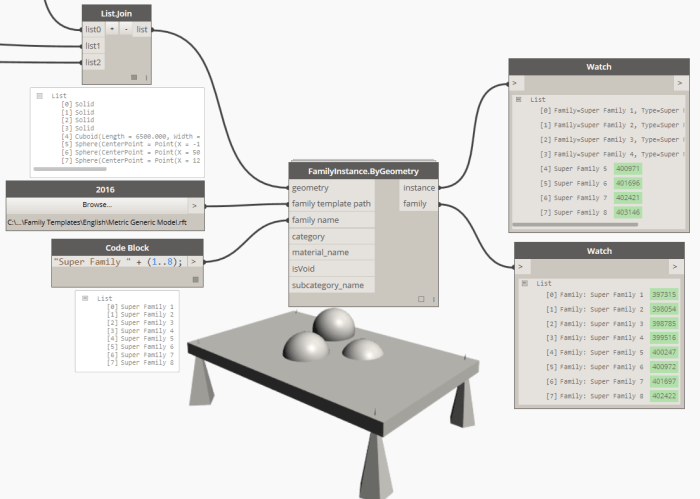
The most important inputs are:
The optional inputs are:
Do note that by default, the node works in “longest” lacing. That means that if any of the optional inputs are less than the geometry objects and the family names, the last input will be used for all remaining families. In the above image, the families at [6] and [7] will belong to the “Generic Model” category and will act as void cuts.
You can download this sample and others from the Spring Nodes repository:
https://github.com/dimven/SpringNodes/tree/master/Samples
Currently the node does not place multiple geometries into a single family. There is a partial workaround described in the following discussion:
https://github.com/dimven/SpringNodes/issues/10
A node for such cases might be developed in the future.
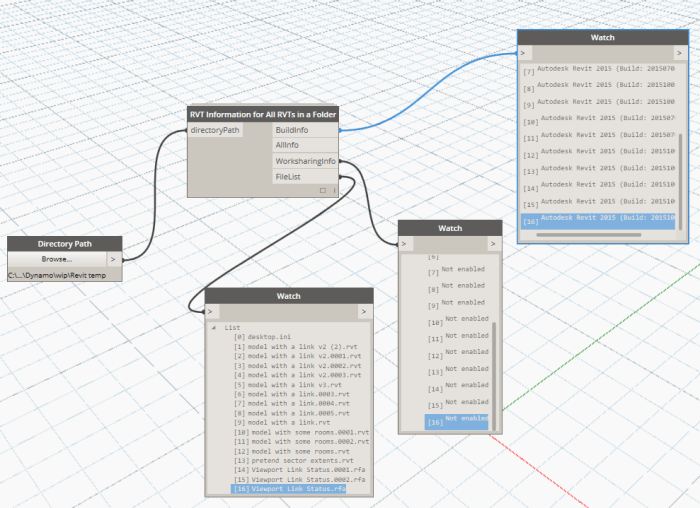
This node takes a Folder as an Input, and then checks each file in that folder for its RVT Build number and Worksharing Status:
This is one of the simplest ways to select Revit objects in Dynamo. Simply feed a Categories selection into this All Elements of Category node, and after the script is Run, those objects will be selected in the Dynamo session.
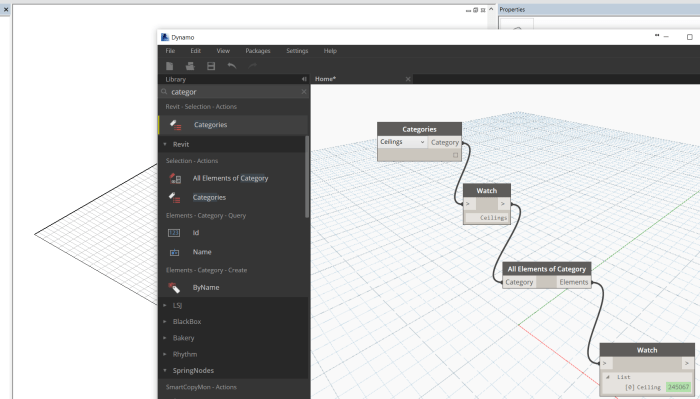
This node provides a base list of Revit Categories and allows the Dynamo user to pick a Category. It then passes a special Category object as an output.
There are a few different types of posts on Dynamo Nodes, but they should all follow the basic rules on this page.
We recommend that you choose from one of these 7 different types of posts…
1) Basic Node Post
This post will have this basic Template:
2) Detailed Node Post
This template contains more information, such as:
As you can see, a Basic Post can be edited and converted to a Detailed Post, simply by adding the extra information.
3) Workflow Post
This is a way to share completed script workflows, typically as a DYN script attached to the post. These should be added to the Category Workflows in WordPress, and the post title should begin with Workflow:
4) Package Overview Post
If you would like to share an overall aim or story related to a specific package, please do this once for each package only, Tag with PackageDescription, and title the post like this:
What is PackageName?
5) Package Index
This post type is a list of all nodes in a specific package. Initially, this should be a flat list of Node names in text format, and then links can be added as each node page is posted to Dynamo Nodes. Tag with PackageIndex. We can use various tools to update these pages from time to time.
6) Resource Post
This post type is a way to share or re-share useful Dynamo resources that appear on other sites. Categorize as Resource Links. Tag with ResourceSharing. Begin post name with Resource:
7) Video Post
This is a way to share or re-share training or demonstration videos, related to Dynamo or DynamoBIM generally. Categorize as Videos. Tag with VideoSharing. Begin post title with Video:
Creates QR codes based on a string input. Accepts single arguments as well as lists. There is also support for color and adjustment to the error correction level. (See QR.ECClevel)
Inputs:
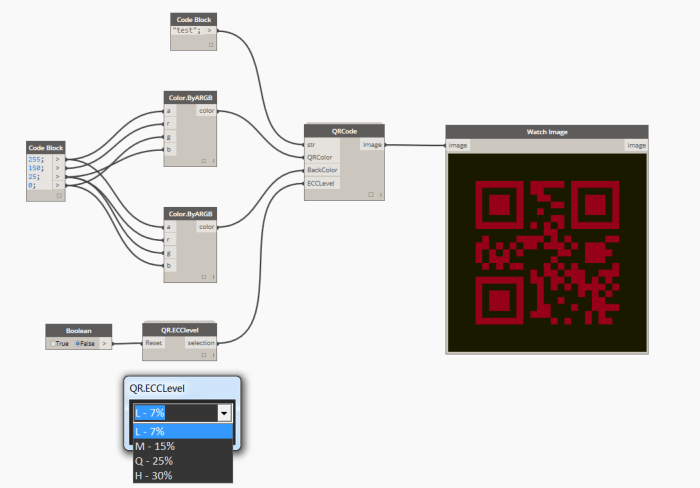
Source: http://jbdynamo.blogspot.no/2016/01/qr-codes-in-dynamo-revisited.html
Create worksets in Revit via a list of names. (strings)
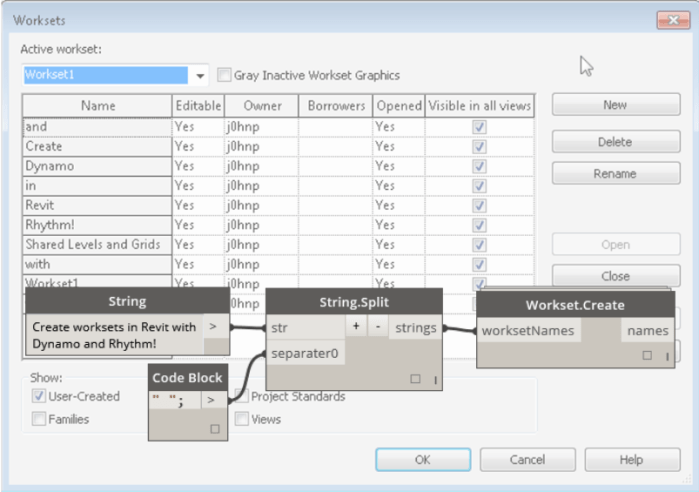
Source: http://sixtysecondrevit.blogspot.com/2015/06/revit-create-worksets-with-dynamo.html


