Geometry.SplitRecursively

Performing recursive actions with nodes is never easy. You usually have to resort to some form of a script. The below case is a good example of this. It uses Dynamo’s DesignScript language to recursively cut the resulting geometry over and over, until the list of cutting tools is exhausted. For a successful result, the cutting tools have to be sorted in the order of which the geometry should be cut.


dynamosandbox_2016-12-16_21-18-28

Inputs:

  • geometry: the solid or surface you’re trying to split
  • tools: the objects you’re trying to cut your geometry with, for example a list of planes or surfaces.
  • pickPoint: a point that is near the end of the cut tools and controls the direction of the cut.

DirectShape.ByGeometry, DirectShape.Transform

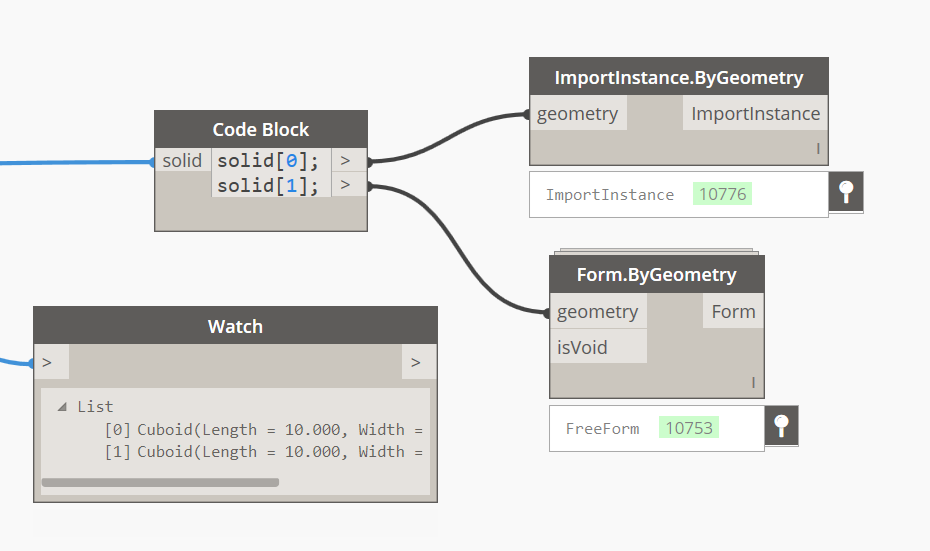
You are probably wondering what these DirectShape objects(refered to as DS from now on)  you’ve been seeing in the last few releases of Dynamo are all about and how are they any better than the built in “ImportInstance” SAT objects or family instances? Well here’s a brief summary:

  • They are very lightweight. They produce 3d geometry that is usually 20-30% smaller in size compared to conventional form based family instances.
  • DS objects belong to a category. This means that they can have type and instance based project parameters. They can also be scheduled or have rule based filters applied to them.
  • They can be transformed and translated incredibly quickly. Read on to find more about how to do that.

The “DirectShape.ByGeometry” node converts a Dynamo surface, poly-surface or solid into a Revit design script object type (which is a system type) and places an instance of that type inside your project, reflecting the geometry position from inside Dynamo. It currently supports Revit 2015 and 2016.

Revit_2016-02-18_23-45-14.png

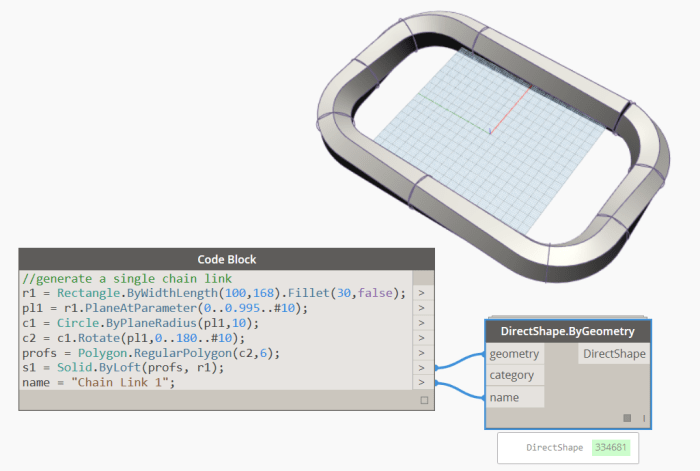
The most important inputs are:

  • The geometry objects
  • A unique type name for each geometry object

The optional input is:

  • Category. The default value is Generic Model. Direct shapes have much less restrictions on categories compared to families.

Spring nodes’ DS implementation differs from the built in DS nodes in a few ways. The main difference is that this implementation produces smooth curved surfaces(similar to the SAT imports), instead of tessellated objects. This however comes at a price – you can not assign material properties to DS objects due the current restrictions in the Revit API.

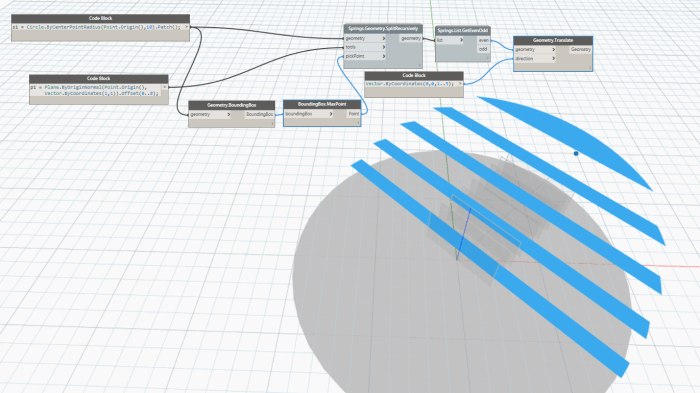
The other major difference is that spring nodes’ DS objects have a type.This means you can assign type parameters to them and reuse the type’s stored geometry either by translating or transforming it. This can result in the quick generation of large compilations of complex geometry arrays. Let us build up on the previous graph:

Revit_2016-02-19_00-10-35.png

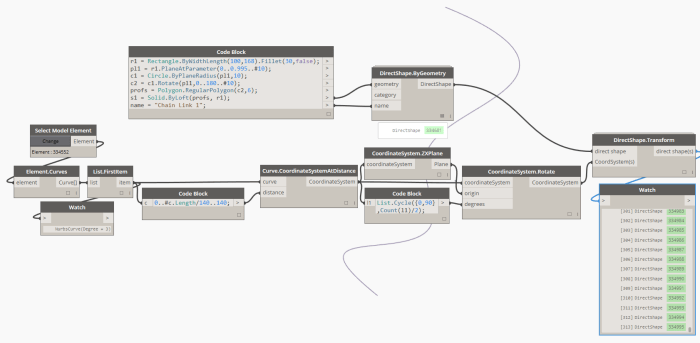
This graph manages to produce over 300 uniquely orientated, complex geometry elements in less than a second! Try to do that with any other Revit object.

The “DirectShape.Transform” node takes the following inputs:

  • a spring nodes typed direct shape instance
  • one or more coordinate systems

DirectShape sample 1.png

And the best part?explorer_2016-02-19_00-14-24.png

It does so by consuming just a few megabytes!

Once you’ve finalized your design, you can start populating the DS elements with different parameters and start scheduling them:

DirectShape schedule

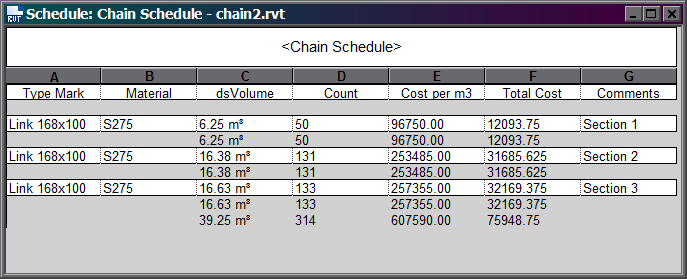
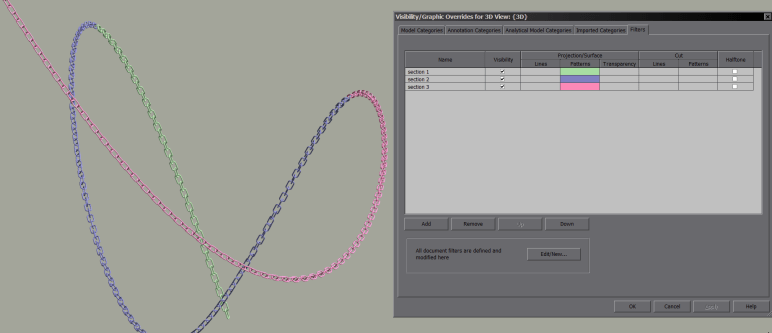
You can not add any materials, but you can easily override their visual graphics representation or create rule based filters:

DirectShape filters.png

DS objects have both pros and cons. I personally see them as the perfect “temporary objects” or placeholder geometry in the early design stages of a project. Think of the possibility of creating tens or even hundreds of unique and lightweight design options that can coexist in a single Revit project. You’ll be able to quickly quantify and compare the different designs and once ready, send them along to the client in a nicely wrapped Revit file. Or if you are rushing for a deadline and do not have the time to create highly specific parametric content for an iteration that could very likely be thrown away by next week, you could quickly pop in a few DS elements and be good and ready.

Alternatively, imagine the following situation  –  you need to share your model with one of your biggest rivals. You have used hundreds of internal highly – parametric and intelligent families, that you’ve invested thousands of man-hours developing. You must  share all your geometry and data but you still want to keep your competitive advantage.Well, why not simply “freeze” some of your families by converting them to static DS objects? You’ll be able to transfer their entire parameter information and preserve the geometry without delivering your secret sauce to the competition on a silver platter. This sounds more sinister, but still could be a valid use for the DS nodes.

You can download this sample and others from the Spring Nodes repository:

https://github.com/dimven/SpringNodes/tree/master/Samples

Dimitar.

Form.ByGeometry

Form.ByGeometry “bakes” any solid, polysurface or surface passed into it into the active Revit family environment as a Free Form Element type (native Revit geometry). This should be used in the place of ImportInstance.ByGeometry in every instance. (a similar result can be achieved with the FamilyInstance.ByGeometry from a project level). In some cases you should even see handles appear which will allow you to manipulate the goemetry to some level once it is “baked” into Revit.


formbygeoformbygeo

Rhino to Revit (SAT to Spring Nodes)

There are a couple of ways to go about this (all of which require Springs Nodes):

  1. If you are in a family environment it is as simple as this:
  2. If you are at the project level of a Revit project then there is a just a bit more that needs to be added:

In the end though, the results are pretty much the same. You should end up with native Revit, free form elements, some of which will even display handles which can be used to edit this geometry (usually simpler, rectilinear geometries such as boxes will be fully editable, other times things like lofted geometries might have and end face that is editable).


SAT-RH-RVT

SAT-Handles
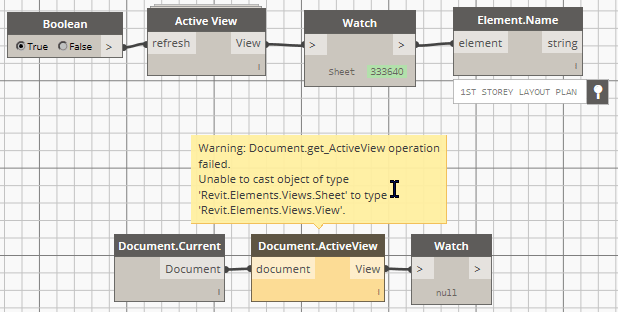
Be aware that there is a scaling issue currently with dynamo’s SAT import nodes where the they only read the geometry as though it were in meters, but this can be easily fixed through some creative scaling before “baking” it into Revit.

sat unit test

This workflow can also be used to bring SAT information into Revit from Inventor as well.


InterferenceCheck.Parse

Process a Revit interference check report (HTML file) and extract the clash types (the categories of the clashing elements), all clashing elements and the total number of clashes. To generate an interference report in Revit, go to Collaborate > Interference Check > Run Interference Check.

Revit_2016-01-31_20-45-03.png

Inputs:

  • report: a file path to the location of the report.
  • fetch_elements: a Boolean toggle (True by default). When true, the node will attempt to fetch the elements involved in each clash. For this to be successful, the node must be executed from the Revit document that the report originated from. If the element does not exist any more, a null value will be returned instead. If you are executing from a different document (or from Sandbox mode), be sure to set “fetch_elements” to False. This will give you the ID of each element as a string for easy documentation.

Outputs:

  • clash categories: all clashes in the report.
  • affected elements: the elements involved in each individual clash.
  • unique cases: each type of clash is listed here only once. Use this to filter in a specific type of clash (and thus its elements).
  • number of clashes: a count for each unique clash type and the sum of all clashes found in the report. Useful for documentation purposes.

The expected result when “fetch_elements” is set to False:

Revit_2016-01-31_20-45-32.png

An example on how to filter a specific type of clash and fetch only its elements:

Revit_2016-01-31_20-46-55.png

In very limited cases, a clash type may not be recognized successfully and will be categorized as “Unidentified”. Please report those cases to the repository.

ErrorReport.Parse

Process a Revit error report (HTML file) and extract the error types, all affected elements and the total number of errors.

Revit_2016-01-31_19-15-37.png

Inputs:

  • report: a file path to the location of the report
  • fetch_elements: a Boolean toggle (True by default). When true, the node will attempt to fetch the elements involved in each error. For this to be successful, the node must be executed from the Revit document that the report originated from. If the element does not exist any more, a null value will be returned instead. If you are executing from a different document (or from Sandbox mode), be sure to set “fetch_elements” to False. This will give you the ID of each element as a string for easy documentation.

Outputs:

  • error messages: all error messages in the report.
  • affected elements: the elements involved in each individual error.
  • unique errors: each type of error is listed here only once. Use this to filter in a specific type of error (and thus its elements).
  • number of errors: a count for each unique error type and the sum of all errors found in the report. Useful for documentation purposes.

The expected result when “fetch_elements” is set to False:

Revit_2016-01-31_19-16-12.png

An example on how to filter a specific type of error and fetch only its elements:

Revit_2016-01-31_20-05-28

Dictionary.ByKeysValues

Dictionaries are an incredibly powerful tool for making associative sets between two equal length lists. The first is a list of keys (or indexes) and the second – a set of values (or the data that will be returned for each index).

DynamoSandbox_2016-01-31_18-43-25.png

Inputs:

  • keys: it must consist of unique strings or numbers.
  • values: a value that will be returned for each key.
  • search keys: the list of keys(indexes) that you want returned.


Manipulate data, sculpt geometry, explore design options, automate processes by remotely accessing your visual programming environment on trending virtual PCs from CloudDesktopOnline.com powered by one of the best DaaS providers – www.Apps4Rent.com.

The dictionary values can hold lists of objects:

DynamoSandbox_2016-01-31_18-58-39.png

Or Revit elements:

Revit_2016-01-31_18-59-53.png

If a search key is not found in the dictionary, an empty list will be returned instead.

Active View

2016-01-28_12-18-07.png

Dynamo already provides nodes out of the box that can fetch the active view. Unfortunately they are not yet able to display some of Revit’s view types. Some of the views that the built-in solution can not currently handle are:

  • Sheet views
  • The Project Browser (yes it’s a view)
  • Legend views
  • Keynote legend views
  • Schedule views
  • Structural plan views (added in version 0.9)

“Active View” is a temporary solution to solve that problem. Once support is added for all view types, this node will be depreciated from the package.