Add View Filters to View

This node will take a list of view filters, and a single view, and apply those filters to the view.

The Boolean switch determines if the filter will be automatically ‘unticked’ when it is applied. Setting false will untick, effectively hiding elements that match those filters.

Future versions could look at applying more complicated colour overrides to each filter.

Create View Filter

This creates a simple view filter based on the following inputs:

· Categories

· A built in parameter name (not the same as a natural parameter name)

· A parameter value

· Desired filter name

The filter element can then be applied to Views or View Templates.

The type of filter created is a simple “Contains” rule. However, the code could be modified and extended to handle all of the various rule factory conditions (see here).

Duplicate Views

In some cases it is difficult to multi-select and Duplicate multiple Views in the Project Browser. This node takes a list of Views and attempts to Duplicate them. It also takes a duplicationOption as input, which is by default set to Duplicate. This first version does not return the newly created views as elements (ie. the views usually appended with “Copy 1”), but it should do so in future version.

Copy Section Box to List of 3D Views

Sometimes you will want to maintain a number of different 3D views with the same Section Box extents, but perhaps with different View Templates applied. This node was designed to copy the Section Box extent from one 3D view, and apply it to a list of 3D views. It also notifies if the Section Box was applied successfully. In the example below, I simply modified the shape handles of one 3D view Section Box, and then used the definition as shown below to copy the Section Box from the Active View to the other related 3D views. The node deliberately removes the ‘source’ 3D view from the 3D views to be modified.

Revit Section View at Line

In large models, Revit can be agonisingly slow to regenerate when trying to draw a new Section View (it is usually trying to detect the required view depth). This node was created to quickly make section views by selecting Line elements in Revit. Here’s how to use it:

1. Open a Plan where you can see Revit Lines

2. Open Dynamo

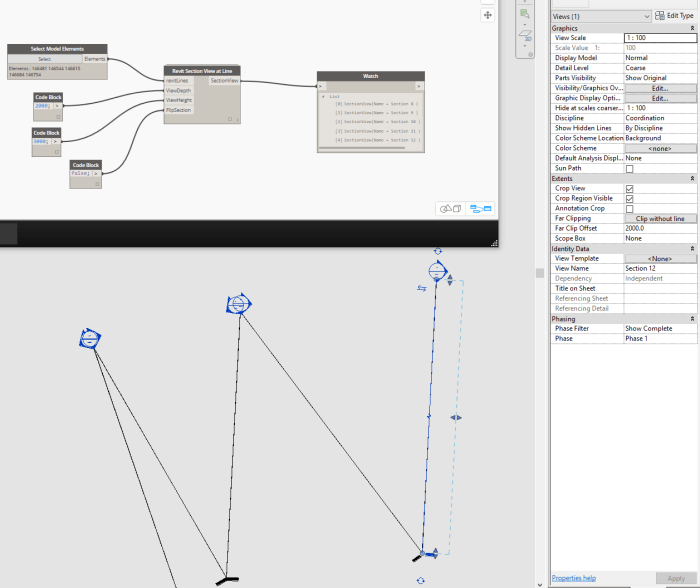
3. Place the Revit Section View at Line node

4. Set desired View Depth (Far Clip Offset)

5. Set desired View Height (the base of the section will likely be Floor Plan level, with top of the section based on this value)

6. Set FlipSection to true if you want to rotate the plane through 180 degrees (effectively flipping the section)

7. Use “Select Model Elements” or a similar element collection node or method to feed a list of Detail Lines and/or Model Lines into the revitLines input

This initial version has been set up for Sections intended to be visible on Plan views, and will not work in other planar situations (such as running from an Elevation). Future versions could look at working on any Line in any view, and possibly allowing any plane Rotation (such as 90 degrees for perpendicular sections).

Note: you may have to press Run twice to make it work, depending on your version and system?

This screencast shows the node in action:
https://knowledge.autodesk.com/community/screencast/e316f8ef-9bab-4857-be9d-8562191a0024

Set Worksharing Display Mode for Views on Sheets

This takes two inputs:

· part of a Sheet Number

· Worksharing Display Mode name (string, default value is ‘Off’)

Then, it will collect all the Views on Sheets that contain that Sheet Number, and it will then attempt to set the Worksharing Display Mode for those views to the desired mode that was input. It will report true/false in the Set OK? Output. Also, the ListOfAllModes output shows all of the Worksharing Display Modes that are available in this project.